Roux — Second Block
Contents
Overview
In second block you want to solve a 1x2x3 block in the lower two-thirds of the R face. Because you want to be efficient, you should hold first block firmly in your left hand and never break it during this step. In order to solve SB you will use only U R r M moves because those are precisely the moves that don't break first block. Just like first block, before going into examples for second block lets see how good it is theoretically possible to get at it. In SB the R center is automatically solved, leaving 5 necessary pieces: the DR (9 perms, 2 ors), FR (8 perms, 2 ors), and BR (7 perms, 2 ors) edges and the DFR (6 perms, 3 ors) and DBR (5 perms, 3 ors) corners. Together these give 1088640 possible cases for SB. This is a small enough number that I was able to write some Python code to solve every single case optimally using only U R r M moves. Second block is the step that actual solvers are typically worst at compared to computer optimal. Like for first block, I wrote an optimal second block solver that you can use. Note that by optimal I mean optimal solutions using only U R r M moves. For some cases, there may be shorter solutions that break first block along the way but these are not considered as they are not Roux-style.
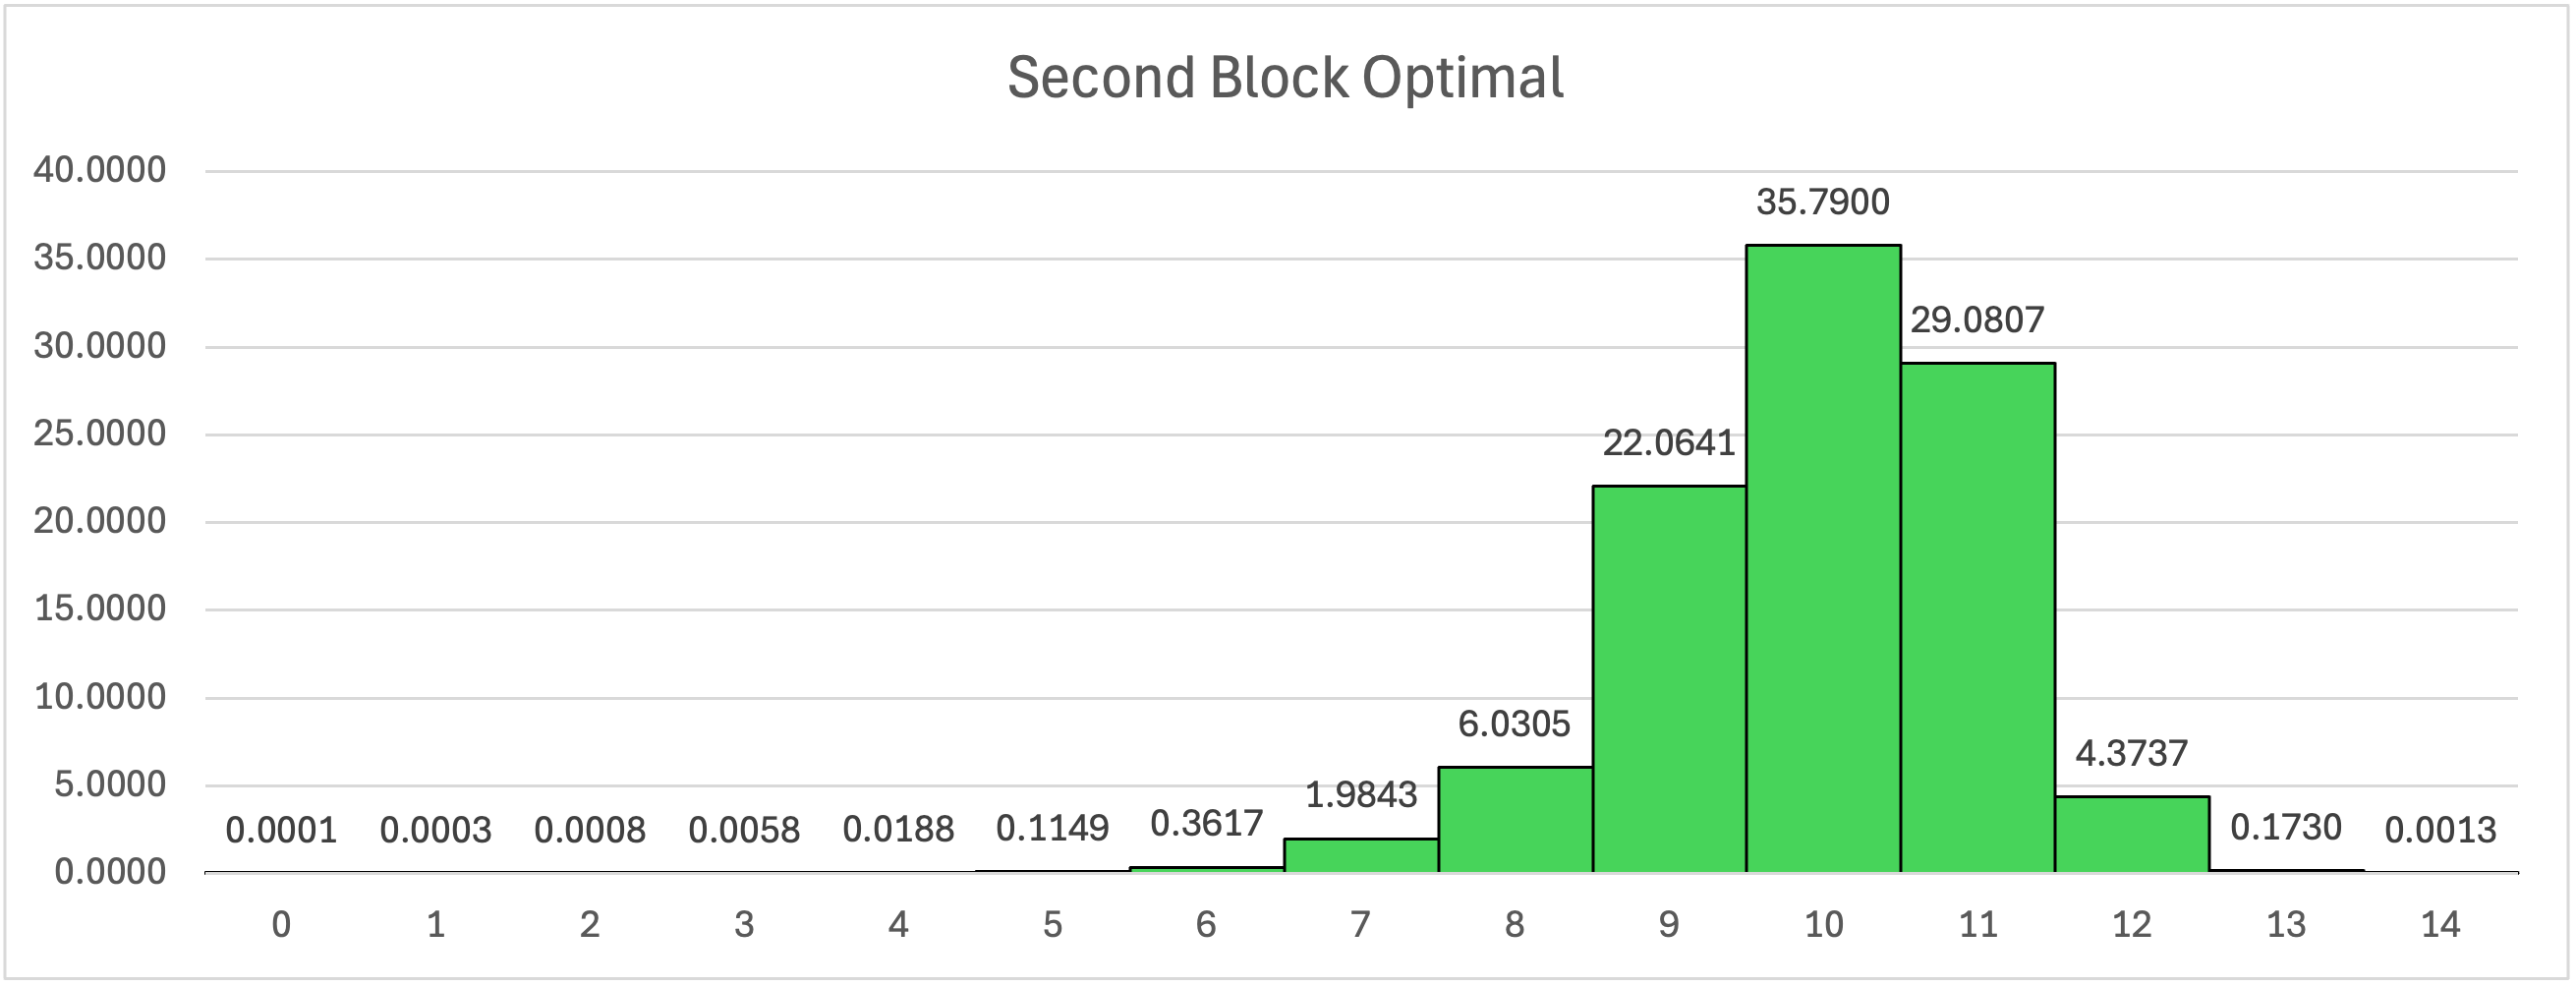
Second Block Statistics
| Average Moves: | 9.96 |
| Standard Deviation: | 1.10 |
| Median Moves: | 10 |
| 95th Percentile: | 11 |
| Max Moves: | 14 |
Novice
A whole lot of what you learned for FB can be applied to SB. You will make corner-edge pairs in the same way, but now to insert them you can't use F or B moves and instead must rely on opening up the F2L-style-slot using an R or r move, inserting using a U move, and then closing the slot. The approach here is basically to solve the DR edge first, then solve the corner-edge pairs in the FR and BR positions. In order to make the corner-edge pairs in this step, you will often bring the edge into contact with the corner using the M slice. The same advice about matching orientations from FB applies to this step. For each pair you get the corner into the U layer and the edge onto the M slice, then shoot the edge to be next to that corner with the correct orientation using an M move. Once you have made the pair, you insert it into the appropriate front or back slot by a classic open-slot, move-in, close-slot technique (often using wide moves). At Novice level, you should be averaging under 22 moves for second block.
 |
Example 1: Solving the DR edge from the worst position. The DR edge on its own is pretty easy to solve, even from the worst possible spot. In this step the only way to change edge orientation is to use the M slice. The only way to take edges on or off the M slice is with a U face turn. An R2 brings Green-Yellow into the U layer. U puts it on the M slice. An M' changes its orientation. A U pairs the Yellow center and Green-Yellow edge. An R2 inserts it. Solution: R2 U M' U R2 |
 |
Example 2: Pairing and inserting into the back slot. The same pairing logic applies from first block. We want the bottom color (Green) of our corner to be on either the left or right face when using the M slice to pair. Here if we do an M2 to unite the Yellow-Orange and Green-Yellow-Orange pieces, they will be misoriented relative to each other. Instead, do a U2 first. Then an M' unites with the correct orientation. Another U2 prepares for insertion. Here is the new part for second block. An r' wide move opens up the back slot for inserting. U' inserts. Then r closes the back slot. Solution: U2 M' U2 r' U' r |
 |
Example 3: Pairing and inserting into the front slot (one way). The Green color of the Green-Yellow-Red corner is on top rather than on the side where we would like it. We can fix this with an R move. Then a U prepares the Green-Yellow-Red corner and Yellow-Red edge for pairing. An M' unites them. A U moves the pair away so that we can close up the front slot with an R'. U' then prepares the pair for insertion. Wide r opens the slot for the pair. U inserts the pair. r' closes the slot and finishes second block. Solution: R U M' U R' U' r U r'. |
|
Example 4: Pairing and inserting into the front slot (another way). We can approach the exact same setup completely differently and make the pair with Green on top. Here do an M2. A U then puts the Yellow-Red edge onto the Yellow side and moves the Green-Yellow-Red corner off of that side. R then readies then for pairing. U2 does the pairing. R' then puts the already built parts of second block back where they belong. U prepares the pair for insertion. R opens the front slot. U' inserts. R' closes the front slot. Notice that this and the Example 3 solution are both 9 moves. Which you choose is personal preference. Solution: M2 U R U2 R' U R U' R'. |
 |
Example 5: That's not where those belong! What do you do when some pieces coincidentally end up in the wrong spot? An R open the front slot with the wrongly placed pieces. U' moves them out of the slot. R' closes the slot and separates them. M2 takes the Yellow-Red edge out of the top layer and down to the Front-Down position. U then aligns the Green-Yellow-Red corner to be paired. Wide r does the pairing and opens the front slot at the same time. U' inserts the pair. r' closes the slot. Solution: R U' R' M2 U r U' r'. |
Intermediate
Just like FB, you need to free your mind a bit and be able to solve pieces in different orders. In principle both square & pair and line approaches from FB are useful in SB but generally square & pair is much much more common. Of course in SB you can't use D moves, so if you do use the line method you will actually match the lines with a U move and then do an R2 to put the entire block in place. Don't always solve the first pieces you see, rather solve the pieces that have the most efficient solution. This is easier the more aware of piece locations you are, which depends on how good your tracking from first block has gotten. At the Novice level you always make a pair first and then insert it. At the Intermediate level you will often set up the insertion and then make the pair while inserting, as we will see in some examples. Also, you don't always have to start with the DR edge. Instead, you can sometimes solve the FR or BR edge first and then make a pair using the DR edge to finish your first square. You should be averaging under 19 moves for second block at the intermediate level.
|
Example 6: Revisiting Example 2. By thinking about how you will insert early-on, you can make pairing + insertion more efficient. An R' sets up an appropriate insert for how the Green-Yellow-Orange corner will eventually go in. A U2 readies it for pairing. M2 pairs.U inserts. R closes the slot. That saved us a move overall! Solution: R' U2 M2 U R |
|
Example 7: Revisiting Examples 3 & 4. Again thinking about pairing and inserting together is more efficient. R turns the Green-Yellow-Orange corner to a more convenient orientation (while opening the front slot). U2 moves it off of the right side. R' closes the front slot. U' prepares for pairing. R opens the front slot. M2 pairs. U inserts. R' closes the slot. This again saves one move over the solutions from Examples 3 & 4. Solution: R U2 R' U' R M2 U R' |
 |
Example 8: Square & Pair. This Square & Pair solution illustrates that often it is best to not just start by solving the DR edge and then solving two F2L style pairs. Here an M2 pairs Green-Yellow and Green-Yellow-Orange U attaches Yellow-Orange to the Yellow center. r' U then completes the first square. R2 places the first square properly. U' moves the Green-Red-Yellow corner to a convenient spot for future pairing. R U prepares the Green-Red-Yellow and Yellow-Red pieces for pairing. M' does the pairing. U inserts them into the slot and R' closes the slot. Solution: M2 U r' U R2 U' R U M' U R' |
 |
Example 9: A Line Solution. This is what a line solution looks like in second block. Personally, I find these much harder to come up with in real solves than square & pair. R' U' puts both the Yellow-Red and Yellow-Orange edges on the M slice with the same orientation. M' orients them both correctly. U' attaches the Yellow-Orange edge to the Yellow center. r2 U' attaches the Yellow-Red edge to the Yellow center appropriately opposite the Yellow-Orange edge and without breaking the Green-Yellow and Green-Yellow-Red pair, completing the edge-center-edge line. r completes the corner-edge-corner line. U' unites the lines. R2 inserts the second block. Solution: R' U' M' U' r2 U' r U' R2 |
Advanced
Again, you must unlock your third-eye and begin to develop your nonlinear thinking in block-building. The biggest difference between intermediate and advanced first block solutions is the ability to think nonlinearly. It is difficult to give general advice here, just examples of what some good solutions look like. At this level it is really useful to use a second block solver. Conveniently, I have built one. Very rarely, you can even use F moves if they make your solution even more efficient. You should be averaging under 16 moves for second block at the advanced level. In theory, in ETM you can always do it in 13 and more than 99% of the time you can do it in 11. Even top solvers are not hitting these numbers currently. Realistically, I think an ultimate-high-level goal of averaging 13 moves at speed is doable.
 |
Example 10: A Tough Line Solution. U M' U attaches the Orange-Yellow edge to the Yellow center and pairs the Green-Yellow and Green-Yellow-Orange pieces. r' U r' completes the corner-edge-corner line. U' completes the edge-center-edge line. R prepares them for uniting. U2 unites them. R2 inserts the block. Solution: U M' U r' U r' U' R U2 R2 |
 |
Example 11: A Line Solution. This is a believable advanced solution. M2 U2 R pairs the Red-Yellow and Green-Red-Yellow pieces while preparing Orange-Yellow and Green-Orange-Yellow pieces for pairing. U r' U' pairs the Orange-Yellow and Green-Orange-Yellow pieces while attaching the Green-Yellow edge to the Yellow center. r' U2 completes the first square. R2 U inserts the last pair. R inserts the block. Solution: M2 U2 R U r' U' r' U2 R2 U R |
 |
Example 12: At least it flows nicely. This is the kind of solution that computers see but people don't. Maybe super crazy Rouxers could come up with this one, but I'm not even close to this. U' R U' R2 U2 sets up all of the pieces of second block to be very cleanly paired and solved simultaneously all together. r2 U r U r seemlessly completes the entire second block. You truly have to be able to hold where all of the pieces are going in your head at once to come up with this one. . Solution: U' R U' R2 U2 r2 U r U r |